Dng Viewer Tutorial
Welcome to the Quick Tutorial!
We’ve created our Quick Tutorial to demonstrate key
features and functionality of DNG Viewer, please reference the collection below.
|
Click and hold down left mouse button
 and image will be moved like mouse is moving
|
|
Roll the mouse wheel forward or away from you to zoom
in/out the image.
|
|
Open File
|
|
First time when DNG Viewer is started file dialog is
opened like image on the left. To open file choose which file extension you want
to open. This viewer, beside DNG, also supports other RAW image file formats, as
CR2, NEF, CRW, RAF and ARW file formats. Select file that you want and click open
to open image in viewer.To open file when DNG File Viewer is already opened just
click the
 icon and file dialog will be opened.
|
|
Resize File
|
|
Image will be opened in original dimension. Image dimension can be changed and image
quality will stay good as it is a vector image. Write dimension of desired image
in Width or Height box, click button

and image will be resized with good quality.
|
|
|
|
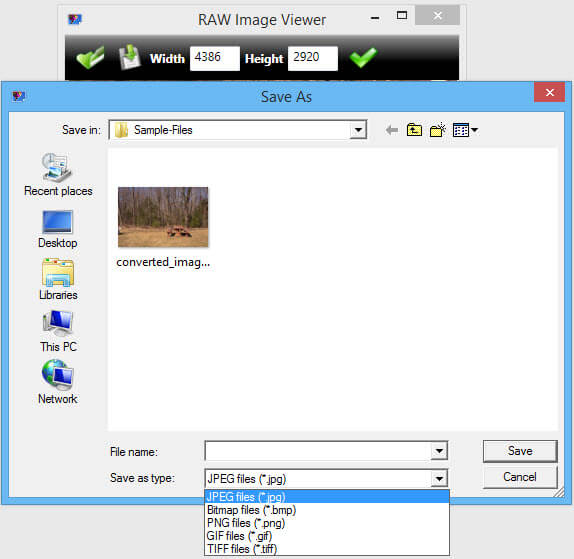
Save File
|
|
Saving DNG files is easy by clicking the
 button, save file dialig will be opened and DNG file can be saved easy into JPG,
BPM, PNG, GIF and TIFF format.
|

|
|
Zoom
|
|
Zoom images by clicking bottom bar
 buttom. Zoom slider will apear next to zoom icon and moving the slider image will
be sized aproximately.
|
|
|
|
Fit To Screen
|
|
After resizing and moving, image can be fit to screen
by clicking bottom bar
 buttom.
|
|
|
|
Rotating image
|
|
Rotating image can be done 90 degrees clockwise or counter-clockwise,
just with clicking on arrow bottom bar buttons.
|
|
|